How to...
 Today I'm searching the net on How TO....effectively dip things in chocolate. Now I've tried this all before to no avail...all on my own with no help.. Well it's time to consult the experts...lol. Here's a article I found below...
Chocolate Dipping Tips
I am by no means a professional, but am happy to
share some of my chocolate dipping tips with you. If you have not yet read my
tab working with chocolate. I highly recommend that you do. This page will explain a
little about tempering and will help you choose a good chocolate to dip with, as
well as help you decide between chocolate and candy melts.
If you are ready to dip... read on!
Working with Chocolate
Chocolate is not the easiest substance to work
with, but knowing a little about it before you begin will save you a big
headache later on. If you are a beginner I recommend working with Candy Melts
first and moving on to real chocolate as you progress. (Scroll down for more
information on Candy Melts.)
 Chocolate
that you buy in a store has been "tempered". This means it has been heated and
cooled a number of times to very precise temperature ranges to create cocoa
butter crystals. These crystals are what give the chocolate a firm set and a
shiny look. Tempered chocolate has a good "snap" when broken. Because of this
hardness, it can be wrapped and kept at room temperature without melting or
leaving chocolate residue on its packaging. Almost all chocolate bars you buy at
the grocery store have been tempered. Chocolate will differ in "hardness" based
on brand and purpose for use. Good quality chips like Guittard are usually
softer than chocolate bars (they usually contain wax or other additives to keep
their shape instead of tempering), and thus they are less ideal for chocolate
dipping. You want to use the "hardest" tempered chocolate you can find as it
will give you the best set. This chocolate is usually found in the candy aisle
by the fancy bar chocolates, or sometimes in the baking aisle.
Chocolate
that you buy in a store has been "tempered". This means it has been heated and
cooled a number of times to very precise temperature ranges to create cocoa
butter crystals. These crystals are what give the chocolate a firm set and a
shiny look. Tempered chocolate has a good "snap" when broken. Because of this
hardness, it can be wrapped and kept at room temperature without melting or
leaving chocolate residue on its packaging. Almost all chocolate bars you buy at
the grocery store have been tempered. Chocolate will differ in "hardness" based
on brand and purpose for use. Good quality chips like Guittard are usually
softer than chocolate bars (they usually contain wax or other additives to keep
their shape instead of tempering), and thus they are less ideal for chocolate
dipping. You want to use the "hardest" tempered chocolate you can find as it
will give you the best set. This chocolate is usually found in the candy aisle
by the fancy bar chocolates, or sometimes in the baking aisle.
Melting chocolate can cause it to lose it's temper. This is where most people run into difficulties when chocolate-dipping at home. This results in a product that is not hard at room temperature; touching it will leave fingerprints, thus it cannot be wrapped, and is incredibly messy to eat. This is what you want to avoid when dipping chocolate.
You can re-temper chocolate at home, but it a very complicated process. I do not temper my own chocolate, but instead attempt to "keep" the crystals (and the temper) that comes in pre-tempered bar chocolate from the store. To "keep" the crystals you'll need to avoid heating the chocolate at high temperatures, as heat destroys the crystals. The hotter your chocolate gets as you melt it, the more crystals you are destroying, and the softer your set will be.
In summary, you want to choose a chocolate with a firm temper and keep it tempered for best results when dipping chocolate.
These are a few tips that will help you as you work with chocolate, particularly if you have never worked with it before. These rules apply to "real" chocolate and not Candy Melts (which contain no cocoa butter and thus do not need to be tempered, and do not seize as easily).
#1-*Never* combine it with water.Water "seizes" chocolate. If even a drop or two gets into your bowl, or you use a damp spoon right out of the dishwasher- you can seize an entire bowl of melted chocolate. You will know if it has seized. Your mixture will get thick and clumpy and grainy. It is nearly always impossible to salvage. You will not be able to use it for dipping, although if you add about a Tbsp of vegetable oil or shortening and mix until smooth, most of the time this chocolate can still be used in other recipes that call for melted chocolate, like brownies, cookies, or syrups.
This water rule includes coloring and flavorings that contain water. If you would like to color or flavor your chocolate you need to use Candy coloring or flavoring. These can be found at Hobby Lobby or other craft stores, and specifically say "Candy" on the package. If you look at the ingredient list they will contain oils and not water.
#2-Melt at the lowest heat possible. Overheated chocolate will seize even if no water has gotten into your bowl. This is one of the reasons it is important to melt chocolate at the lowest possible heat until smooth. You can use a double boiler to melt your chocolate, which usually keeps the temperature low. Essentially you place an inch or so of water in the pot of a double boiler, place it over low heat, and place the pan on top where you will place your chocolate. Your chocolate should never touch the water. This method can be tricky, however. The boiler pot can produce quite a bit of steam and water droplets, which can easily seize your chocolate, and you must constantly be checking that the water is not boiling and the bottom of your chocolate bowl is dry. This method is also very slow. Recently I have found it to be much more trouble than it is worth.
I typically prefer to melt my chocolate in the microwave. Each microwave is different so you really need to pay attention to your machine and always err on the side of caution. For me, it works best to microwave at 50% power, stirring my chocolate every 30 seconds or so. Most of my chocolate melts in about a minute and a half total. If your chocolate is nearly melted, it is a good idea not to put it back in the microwave for another round, but to stir until the small chunks have been melted by the hot chocolate. This will keep the chocolate from overheating and losing it's temper and will also ensure you don't seize your chocolate. If your chocolate is nearly melted but you really need to put it in the microwave for another round- try only 15 seconds or so at 50% power.
After the initial 30 second round, you may look at your chocolate and think, "This doesn't look melted at all. It doesn't need to be stirred.". It *does* need to be stirred. Even if none of your chocolate is melted, parts of it have trapped heat, and the uneven heating of a microwave has concentrated it in certain areas. If you don't stir it, it is very likely you will scorch or seize your chocolate.
If your chocolate has seized as a result of overheating, you can try adding a Tbsp or so of vegetable oil or shortening to it. If you can mix it smooth, you may still be able to use it for dipping (although it may set "soft"). If not, you can still use this chocolate for other projects, like cookies and brownies as mentioned above.
If your chocolate has not seized, but you are afraid you have overheated it (if the bowl burns you it has probably gotten too hot!), you can try to salvage the temper by using the seed method. Add a handful or so of solid (unmelted) chocolate to your bowl and stir until the temperature of the chocolate mixture has come down and the chocolate chunks are completely melted. Essentially you are adding more "seeds" or "crystals" to your chocolate since you have likely lost most of yours (and thus your temper) by overheating. If you have access to large blocks of chocolate, it is sometimes easiest to add a large chunk and stir it in until it will not melt any longer. Then you can just remove what is left of the chunk and not have to worry about having small unmelted bits in your mixture that end up needing another round in the microwave. (Do not mix different brands of chocolate however; if you want to do this, make sure you use this same chocolate initially.)
If you dip something in chocolate and it never sets at room temperature, you have overheated your chocolate and lost it's temper. Try melting at a lower heat next time.
#3 Get the hardest possible set.Getting a hard set is really important if you want to wrap your treats or give them away. If you do not care, you can use untempered chocolate (Guittard milk chocolate chips are delicious) and just keep your treats in the refrigerator until right before eating. But usually you will probably want a firm set for your treats.
The trick is a combination of things we've already discussed. Use a hard-tempered chocolate. It should snap when broken. It should not be a soft chocolate. Melt it at the lowest possible temperature, and stir in an extra square or two after melting the rest of your mixture to ensure your chocolate has lots of crystals. (It is okay if your square doesn't completely melt and you need to remove it.)
Candy melts are a type of "pseudo-chocolate" used often in candy making. They are usually disc shaped and found in the baking aisle of craft stores and sometimes even Walmart. They come in a multitude of colors. These are best for beginners to work with, because they melt like a dream and set up very hard. They are very runny when melted so they dip easily and beautifully. Candy melts do not have cocoa butter in them, so they do not need to be tempered. In this sense they are not a "true" chocolate although the brown ones do contain cocoa powder which makes them taste a bit like real chocolate.
The con to using candy melts is that they don't taste very good. I actually quite like the white candy melts that are sold at Hobby Lobby (Make-n-Mold brand), but I have yet to find an impressive brown chocolate candy melt. I typically tint my own chocolate so I don't usually buy colored melts and cannot make recommendations there. In my experience the Wilton brand melts are the most widely available, but also my least favorite. I do not care for them.
When buying candy melts, look for melts that are not discolored or dotted with white. Old melts can seize and do not melt very well. Unfortunately it is not uncommon for stores to sell melts that are up to 5 years old! If it doesn't look right, don't buy it.
Candy melts are great for painting into candy molds and making "chocolate" suckers. They are also great for drizzling, and piping hearts, skeletons, or words, for topping cupcakes or cakes.
A
Little About Working with Chocolate
 Chocolate
that you buy in a store has been "tempered". This means it has been heated and
cooled a number of times to very precise temperature ranges to create cocoa
butter crystals. These crystals are what give the chocolate a firm set and a
shiny look. Tempered chocolate has a good "snap" when broken. Because of this
hardness, it can be wrapped and kept at room temperature without melting or
leaving chocolate residue on its packaging. Almost all chocolate bars you buy at
the grocery store have been tempered. Chocolate will differ in "hardness" based
on brand and purpose for use. Good quality chips like Guittard are usually
softer than chocolate bars (they usually contain wax or other additives to keep
their shape instead of tempering), and thus they are less ideal for chocolate
dipping. You want to use the "hardest" tempered chocolate you can find as it
will give you the best set. This chocolate is usually found in the candy aisle
by the fancy bar chocolates, or sometimes in the baking aisle.
Chocolate
that you buy in a store has been "tempered". This means it has been heated and
cooled a number of times to very precise temperature ranges to create cocoa
butter crystals. These crystals are what give the chocolate a firm set and a
shiny look. Tempered chocolate has a good "snap" when broken. Because of this
hardness, it can be wrapped and kept at room temperature without melting or
leaving chocolate residue on its packaging. Almost all chocolate bars you buy at
the grocery store have been tempered. Chocolate will differ in "hardness" based
on brand and purpose for use. Good quality chips like Guittard are usually
softer than chocolate bars (they usually contain wax or other additives to keep
their shape instead of tempering), and thus they are less ideal for chocolate
dipping. You want to use the "hardest" tempered chocolate you can find as it
will give you the best set. This chocolate is usually found in the candy aisle
by the fancy bar chocolates, or sometimes in the baking aisle.Melting chocolate can cause it to lose it's temper. This is where most people run into difficulties when chocolate-dipping at home. This results in a product that is not hard at room temperature; touching it will leave fingerprints, thus it cannot be wrapped, and is incredibly messy to eat. This is what you want to avoid when dipping chocolate.
You can re-temper chocolate at home, but it a very complicated process. I do not temper my own chocolate, but instead attempt to "keep" the crystals (and the temper) that comes in pre-tempered bar chocolate from the store. To "keep" the crystals you'll need to avoid heating the chocolate at high temperatures, as heat destroys the crystals. The hotter your chocolate gets as you melt it, the more crystals you are destroying, and the softer your set will be.
In summary, you want to choose a chocolate with a firm temper and keep it tempered for best results when dipping chocolate.
A Few General Rules for Working With
Chocolate
These are a few tips that will help you as you work with chocolate, particularly if you have never worked with it before. These rules apply to "real" chocolate and not Candy Melts (which contain no cocoa butter and thus do not need to be tempered, and do not seize as easily).
#1-*Never* combine it with water.Water "seizes" chocolate. If even a drop or two gets into your bowl, or you use a damp spoon right out of the dishwasher- you can seize an entire bowl of melted chocolate. You will know if it has seized. Your mixture will get thick and clumpy and grainy. It is nearly always impossible to salvage. You will not be able to use it for dipping, although if you add about a Tbsp of vegetable oil or shortening and mix until smooth, most of the time this chocolate can still be used in other recipes that call for melted chocolate, like brownies, cookies, or syrups.
This water rule includes coloring and flavorings that contain water. If you would like to color or flavor your chocolate you need to use Candy coloring or flavoring. These can be found at Hobby Lobby or other craft stores, and specifically say "Candy" on the package. If you look at the ingredient list they will contain oils and not water.
#2-Melt at the lowest heat possible. Overheated chocolate will seize even if no water has gotten into your bowl. This is one of the reasons it is important to melt chocolate at the lowest possible heat until smooth. You can use a double boiler to melt your chocolate, which usually keeps the temperature low. Essentially you place an inch or so of water in the pot of a double boiler, place it over low heat, and place the pan on top where you will place your chocolate. Your chocolate should never touch the water. This method can be tricky, however. The boiler pot can produce quite a bit of steam and water droplets, which can easily seize your chocolate, and you must constantly be checking that the water is not boiling and the bottom of your chocolate bowl is dry. This method is also very slow. Recently I have found it to be much more trouble than it is worth.
I typically prefer to melt my chocolate in the microwave. Each microwave is different so you really need to pay attention to your machine and always err on the side of caution. For me, it works best to microwave at 50% power, stirring my chocolate every 30 seconds or so. Most of my chocolate melts in about a minute and a half total. If your chocolate is nearly melted, it is a good idea not to put it back in the microwave for another round, but to stir until the small chunks have been melted by the hot chocolate. This will keep the chocolate from overheating and losing it's temper and will also ensure you don't seize your chocolate. If your chocolate is nearly melted but you really need to put it in the microwave for another round- try only 15 seconds or so at 50% power.
After the initial 30 second round, you may look at your chocolate and think, "This doesn't look melted at all. It doesn't need to be stirred.". It *does* need to be stirred. Even if none of your chocolate is melted, parts of it have trapped heat, and the uneven heating of a microwave has concentrated it in certain areas. If you don't stir it, it is very likely you will scorch or seize your chocolate.
If your chocolate has seized as a result of overheating, you can try adding a Tbsp or so of vegetable oil or shortening to it. If you can mix it smooth, you may still be able to use it for dipping (although it may set "soft"). If not, you can still use this chocolate for other projects, like cookies and brownies as mentioned above.
If your chocolate has not seized, but you are afraid you have overheated it (if the bowl burns you it has probably gotten too hot!), you can try to salvage the temper by using the seed method. Add a handful or so of solid (unmelted) chocolate to your bowl and stir until the temperature of the chocolate mixture has come down and the chocolate chunks are completely melted. Essentially you are adding more "seeds" or "crystals" to your chocolate since you have likely lost most of yours (and thus your temper) by overheating. If you have access to large blocks of chocolate, it is sometimes easiest to add a large chunk and stir it in until it will not melt any longer. Then you can just remove what is left of the chunk and not have to worry about having small unmelted bits in your mixture that end up needing another round in the microwave. (Do not mix different brands of chocolate however; if you want to do this, make sure you use this same chocolate initially.)
If you dip something in chocolate and it never sets at room temperature, you have overheated your chocolate and lost it's temper. Try melting at a lower heat next time.
#3 Get the hardest possible set.Getting a hard set is really important if you want to wrap your treats or give them away. If you do not care, you can use untempered chocolate (Guittard milk chocolate chips are delicious) and just keep your treats in the refrigerator until right before eating. But usually you will probably want a firm set for your treats.
The trick is a combination of things we've already discussed. Use a hard-tempered chocolate. It should snap when broken. It should not be a soft chocolate. Melt it at the lowest possible temperature, and stir in an extra square or two after melting the rest of your mixture to ensure your chocolate has lots of crystals. (It is okay if your square doesn't completely melt and you need to remove it.)
So What About Candy Melts?
Candy melts are a type of "pseudo-chocolate" used often in candy making. They are usually disc shaped and found in the baking aisle of craft stores and sometimes even Walmart. They come in a multitude of colors. These are best for beginners to work with, because they melt like a dream and set up very hard. They are very runny when melted so they dip easily and beautifully. Candy melts do not have cocoa butter in them, so they do not need to be tempered. In this sense they are not a "true" chocolate although the brown ones do contain cocoa powder which makes them taste a bit like real chocolate.
The con to using candy melts is that they don't taste very good. I actually quite like the white candy melts that are sold at Hobby Lobby (Make-n-Mold brand), but I have yet to find an impressive brown chocolate candy melt. I typically tint my own chocolate so I don't usually buy colored melts and cannot make recommendations there. In my experience the Wilton brand melts are the most widely available, but also my least favorite. I do not care for them.
When buying candy melts, look for melts that are not discolored or dotted with white. Old melts can seize and do not melt very well. Unfortunately it is not uncommon for stores to sell melts that are up to 5 years old! If it doesn't look right, don't buy it.
Candy melts are great for painting into candy molds and making "chocolate" suckers. They are also great for drizzling, and piping hearts, skeletons, or words, for topping cupcakes or cakes.
So... Chocolate or Candy
Melts?
This is a personal decision. Some people only use
real chocolate for dipping, while others use Candy Melts for nearly everything.
My rule is if I am going primarily for taste- I use real chocolate for dipping.
If I am going primarily for looks- I use candy melts for dipping. (Particularly
if you are wrapping up your goodies or serving them as a party- because the
melts will guarantee you a hard set and not a gooey mess!)
Chocolate Dipping
Tools
You don't need a lot of fancy tools for chocolate dipping at home. You can use a simple fork or spoon to rest cookies or other treats on while you dip them into chocolate, but since the dipping sets are so cheap, I do recommend getting a set if you are planning to dip more than once. The "fork" is particularly useful for cookies, and the "spoon" is best for truffles and cake bites. The dipping spoon in particular, allows excess chocolate to drip off through the hole in the middle, so your finished product will not be resting in a big pool of chocolate like it will if you use a regular spoon. Some stores also sell plastic sets which are only a few dollars but I prefer the metal sets for repeated use.
Dipping... What do I actually
DO?
1. Prepare your item to be dipped.
If you want to practice or experiment, Oreo
cookies are a great starting point. Have your item of choice out, at room
temperature (unless otherwise stated in the recipe), and completely dry.
Dampness can seize your chocolate, so when dipping fruits and other damp items,
it is best to let them drain or "dry out" for 15 minutes or so on a countertop.
Be sure to pat them dry before beginning.
2. Choose an appropriate container.
If you are dipping something long like pretzel
rods, it may be a good idea to melt your chocolate in a tall skinny glass so
your chocolate will be very "high" on your rod. If you are using only a small
amount of chocolate, or dipping only a few treats, it is a good idea to melt
your chocolate in a custard bowl or shallow cup. This will make your chocolate
higher in the container so you can completely submerge your treats. If you are
using large amounts of chocolate it usually does not matter what container you
use; just make sure it is microwave safe!
3. Melt your chocolate.
Break or cut your chocolate into small chunks.
Microwave at 50% power in increments of 30 seconds, stirring after each
interval. After 1 min 30 seconds, melt in intervals of 10-15 seconds only. Do
not let the chocolate get too hot. If your mixture is nearly all smooth, don't
microwave again, but stir for a few minutes, allowing the hot chocolate to melt
the remaining chocolate lumps.
You want your chocolate to be "of dipping
consistency". This means, very thin. A thin chocolate will coat your dipping
item smoothly and evenly and will drip off nicely. If your chocolate is
completely melted and still not thin, you may need to add a bit of shortening or
vegetable oil to thin it out. (This is often the case when using chocolate
chips because they contain wax and other thickeners.)
4. Dip your item.
Be sure that your chocolate is not TOO hot (it
will run right off your treat and won't leave a very thick coating) and not too
cool (it will "gloop" on your dipped item and will not run off nicely and
evenly.) As your practice, you will come to know when your chocolate is at the
best temperature for dipping.
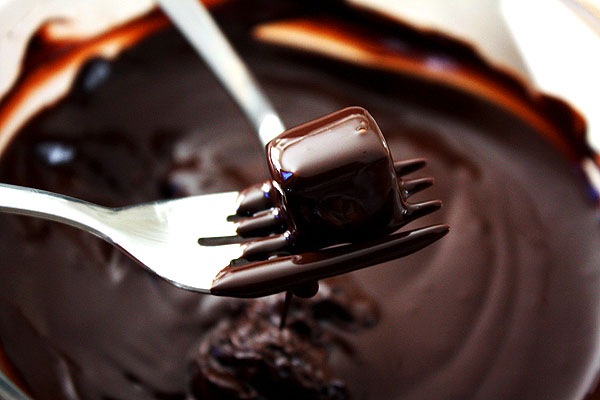
Place item to be dipped on chocolate dipping fork
or spoon (or use a regular fork or spoon) and dip straight down into your
chocolate mixture. If the chocolate is not deep enough for the item to be
completely submersed, either dip your item half-way (cookies dipped half in
chocolate look great), or tilt your container towards you about 45 degrees to
make a little "pillow" of chocolate in front which is deep enough to cover your
treat. If you'd like you can roll your treat around in the chocolate, or turn it
over several times to get it completely coated. Pull the item back out with
chocolate dipping fork or spoon.
TAP the fork or spoon gently on the side of
your container. This will pull excess chocolate back into the container and
will leave less of "puddle" when you set your treat down to cool. It will also
help you get a smooth coat on your treat.
5. Place your dipped treat onto a parchment
lined tray.
The parchment will keep the chocolate from
sticking. A Silpat is another alternative. When all treats have been dipped,
move the tray to the refrigerator if desired to help them cool quickly. You can
also use the freezer but the quick cooling of the chocolate can sometimes cause
cracks in your chocolate so I do not recommend this.
6. Remove from refrigerator when set and
package up or consume.
Treats can be stored in the refrigerator, but
chocolate can bloom or turn grainy after a few days in the refrigerator so keep
this in mind. (This can also happen out of the refrigerator, but I've found it
much more likely in the fridge as the cool temperature exacerbates the
separation).


Comments
Post a Comment